Showing posts with label android. Show all posts
 temple run 2
Temple Run 2
Temple Run 2 is an excellent game with great graphics for  android. The people who start playing this android game will get addicted to it in short time. With over 170 million downloads, Temple Run redefined mobile gaming. Now get more of the exhilarating running, jumping, turning and sliding you love in Temple Run 2!

Navigate perilous cliffs, zip lines, mines and forests as you try to escape with the cursed idol. How far can you run?! Downlaod apk file and let's play your challenge!

Game features:
-Beautiful new graphics
-Gorgeous new organic environments
-New obstacles
-More powerups
-More achievements
-Special powers for each character
-Bigger monkey!!!

Screenshot:
Temple Run 2 - secreenshot

What's New in version 1.5?
Guy Dangerous and his friends have been finding mysterious artifacts throughout the land. Can you find them all?

Requires Android: 2.1+
Download file: 38MB (Temple Run 2 v1.5 APK)

Download file


Hello Friends, today i'm back with a trick how to root you android just in one minute. Recently, posted this Advantages of rooting your android smartphone, Must read this post and get advantages of rooting. Android rooting is the process of allowing users of Smartphone’s, tablets, and other devices running the Android mobile operating system to get the full control and authority within Android’s subsystem. When you root an Android phone it enables you to act as the administrator of the phone. Android rooting provides you the facility to completely remove and replace your device’s operating system.

Root Your Android Phone Just In One Minute:
As we told that now a day’s its very easy to root your Android device it’s all because of numerous Android rooting software, just like “One click Root”. This is a most preferred rooting software, it is designed to do one thing – root any Android Smartphone or tablet as quickly and safely as possible. One Click Root is the world’s leading Android rooting software. With just a single click, you can root your Android Smartphone or tablet and have access to hundreds of new and exciting features. With the help of this software you can root your device just with single click, You just need to connect your Android to the computer via USB, download the program and rest all leave it to ‘One Click Root

Conclusion :
Though it has many advantages but rooting an Android without following proper instructions can be risky. But with the help of such software’s you can easily root your device and can have much out of it as it will speed up your Android’s performance, increase its battery life, and access hundreds of new and exciting features. And Rooting an Android device is totally safe and best thing you and your device can have
!
Most of us are very familiar with USB or WiFi tethering, as a method of sharing the Internet connection from an android phone with other devices. But fairly a very few of us are familiar with the opposite process, Reverse tethering. Using reverse tethering you can share your Computer’s internet connection with your Android phone through an USB data cable. This trick is very useful in case you don’t have WiFi router to share your PC’s internet connection.

Use Yous PC's Internet on your Android via USB [Complete Tutorial]
Requirements :

  • 1. Root your phone firstly for rooting process you can read our previous articals about rooting your android phone.
  • 2. Download Android Reverse Tethering from here
  • 3. Install the usb drivers of your phone.

     
Steps :
Step 1: Connect your Android phone with your PC using an USB data cable and ensure that USB debugging is enabled on your phone .
(  
Settings > Applications > Development > USB Debugging > Turn On )
For Devices running Jellybean and later, it can be found at 
( Settings > Developer options >Android debugging >Turn On ) 

S
tep 2: Extract the downloaded zip file and run the adb.exe file .
                     
Step 3: 
Click on 
AndroidTool.exe .


Step 4:
 From the Android reverse tethering utility , select your phone from the “ Select a device “ drop down box the application automatically selects the DNS if somehow it does not selects the DNS  then from the “ Select DNS to use “ dropdown box select manually.
 
Step 5:
 Click on the Connect button to start the reverse tethering process . The utility will then connect with your android phone and install the required apps on your phone . If the utility crashes simply run it over again .
Step 6:
 After the required apps have been installed on your phone , You will be prompted to grant root access to the USB tunnel app . Tap on “Grant” to provide root access to the app and you can access your Computer’s internet connection on your phone .
Thats it and now you will be able to access your Computer’s internet on your Android phone and even all your android apps would be able to access it too . 

NOTE : You might be prompted with an No network connection error in intervals , its nothing to worry about and you can click ok to proceed further.


Thanks for  Xda-developers  for providing the tutorial on Reverse tethering.Any questions comment here.
Today i am going to tell you how to completely back up you current rom. Each time you decide to perform operations on your Android powered device the data saved on its storage memory or even on its SD card might be wiped out. Furthermore, if you want to do things more complicated like flashing a custom ROM, install unofficial updates, or beta firmware, you can brick the phone’s system. But, there is a way in which you can avoid all these things.


How To Fully BackUp And Restore Your Android Phone:

This is exactly what we will be checking during the present step by step guide: how to backup and restore your Android device before installing CUSTOM ROMs, or applying unofficial updates. And the perfect way to do it is by using the ClockWorkMod Recovery custom recovery image. With this you can backup the current ROM that is running on your phone, so in case if something goes wrong while trying to flash a new ROM into the system you will be able to revert and use the old software. This is the perfect method to use for avoiding bricking your smartphone.
As you know, the warranty is void each time you want to complete one of the up mentioned operations, so backing up the software is no longer an option for you. Anyway, you need to get ClockWorkMod Recovery first. If you don’t know CWM is a custom recovery designed to work on the Android platform and offer different capabilities to the users like: making backups, test custom ROMs, perform maintenance operations and so on.
Advantages:
  • You can stop worrying about forgetting to or being unable to back up certain components of your phone, such as text messages - Nandroid backs up everything.
  • You can try out new ROMs, switch between them and the original stock any time by backing up and restoring full images.
  • You will be able to restore to not just your physical phone, but also to any other phone of the same model. Lost your handset and got a replacement? No problem - restore your latest backup and it's as good as the one you had lost.

  • How to Backup and Restore your Android device Using ClockWorkMod Recovery:
    Step 1. First, you should root your device as you cannot install ClockWorkMod Recovery on an un-rooted handset.
    For rooting you phone read our previous posts.

    Step 2.Then you should know that not all the smartphones are being able to support the tool. So, before starting to do something, check here and see if your phone is on the list.

    Step 3.Then, after checking the compatibility and rooting the handset you must go on Google Play and search for the ROM Manager app.

    Step 4. Install the ROM Manager app.

    Step 5.Then open the tool.

    Step 6.Select the “flash ClockWorkMod Recovery” option.

    Step 7.Then, just select “Backup Current ROM” and follow the prompts.

    Step 8.The backup will be completed once you reboot the smartphone.

    Step 9.Now, if you decide to install a custom ROM into the system and something wrong happens just restore the backed up firmware by opening the app again and choosing “Manage and Restore Backup” and then “Restore”.

    Step 10.You will have the old ROM as soon as you reboot the device.

    So, there you have itthat’s how you can backup the current ROM before flashing a custom ROM, or update your Android device with an unofficial firmware, and this by using the ClockWorkMod Recovery tool. If you want to backup the rest of the files from your handset too, you can use other apps, or methods. In this way you can save your personal info whether it is about messages, contacts, calendar saves, Market apps and who knows what else.

    I am Sure this is Awesome post for Android lovers and will enjoy. Yes! This is something big. Now you can find your lost, Misplaced and stolen Android device easily without any third party apps. In our previous post we explained how to Trace your lost android mobile with some apps but Here in this post you don't need any app to find your device where it is. This is can done by simply using Android device manager. Android Manger is one which it will get installed directly on your device when you use Google play for the first time. So you don't need to download any third party apps. Nobody knows that they will lost their device if they know that they will keep them safe for sure so maximum of people don't install any tracking app to trace their lost device. For this people android device manger can work like miracle.

    Find Stolen or Lost Android Mobile Easily:
    Some Advantages:
    • You can find your misplaced mobile or tab.
    • You can erase data in your device from any where
    • Helps you to trace your lost device.
    • Lock your device from anywhere.
    How to use Android device manger to find lost device:
    • First thing you need to do is using your device navigate to security in settings and then to device administrator.
    • Now tap on it and activate if it is off.

    Note: I suggest you to do this step right now  because device administrator must be activate to take advantage of Android device manger.
    • Now go to Google Play Store.
    • You can find Gear icon at right side top. Just like in below screen capture.

    • Now Click on Gear icon then you can find three options My Order,Settings and then last Android device manager.Just click on Android device manager.

    • As soon as you click on android device manager it will find the device with which it is associated.
    • As soon as Android device manger find your device it will show you on Google maps. It will also indicate how far is your distance from you.

    You can find three Options: 
    • Ring: If you click on Ring then your device mobile or tab will ring though it is in silent mode.This feature fails when device is switched off.
    • Lock: If you click on Lock then it will lock your device and you can get new password to access your device.
    • Erase: If you click on Erase then total memory in that device will be erased automatically.Make sure once you click erase then all the data will be deleted including android device manager so it wont work again.That's it Guys I am sure this will help you a lot ! So don't forget to share it.If you have any problem just comment below we will help you out.
    Today, in this post i shared some tips about how to install custom ROMs on your android devices. Recently i shared some another android tricks and tips must check on Android category. First of all, we talking about,
    What is Custom ROMs ?
    One of the best things about the openness of the Android platform is that if you're unhappy with the stock ROM (OS), you can install one of many modified versions of Android (called Custom ROMs) on your device. A custom ROM is simply a version of Android which third-party developers create for your device. They are meant to replace and modified the stock ROM, or the version of Android that the manufacturer provided on your device. There are many reasons why you may want to try a custom ROM on your device. They can potentially increase performance as well as improve battery life.

    My Story:
    I am talking about my android phone, i  have samsung galaxy ace plus (S7500) and upgrade android version 2.3.6 to 4.2.2- feeling happy : We know my android version 2.3.6 but i'm unable to use some applications like apex launcher, superbeam (wifi direct) etc. apps  , So I install a custom rom on my samsung galaxy ace plus, now my android phone's version is 4.2.2 and now i'm very happy because i acess all types of application and i found many features like portable wifi-hotspot, restrict background data in data usage option and i found a cool status bar makes us manage different types of functions easily.
    Now come back to this post,

    How to Find and Install Custom Rom on Android Devices:
    First of all, you need to complete following requirements,

    Requirements:
    1. Root your android phone (use google to find simple way to root your android or go Rooting category of this site).
    2. Install Clockworkmod recovery (helps us to backup and restore your default Rom and install new Rom). We suggest you to backup your default ROM before install new Rom, so go there to find how to backup and restore your rom.

    How to Find and Download Custom Rom on Android Devices:

    Their ROMs usually improve performance and battery life, upgrade your device to a newer version of Android than what the manufacturer supports, and includes some other extras such as enthusiast-level performance settings. If your device is quite popular, then XDA forum is most likely to offer custom ROMs for it.

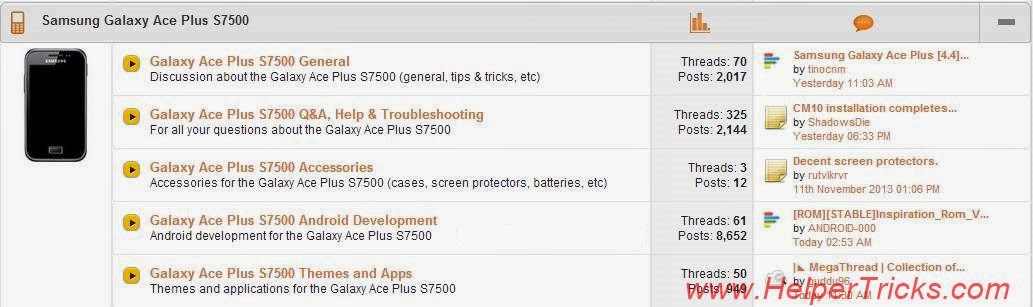
    • Go XDA forum to find your's device ROM. (for example my device is Samsung Galaxy Ace Plus S7500 )
    • Now go your's device Android Development category  (for example Galaxy Ace Plus S7500 Android Development)
    • After that you need to find Stable Rom for your android device.
    • After that Download ROM .zip file, ex: ROM.zip
    • After you download the ROM.zip then Copy the ROM.zip file to the SD Card (do NOT extract it, just copy the whole zip file).

    How to Install Custom Rom on Android Devices:

    1st Method:
    Installing a new ROM (more commonly known as "flashing") is very easy with ROM Manager. Just go back to the "Find and download ROM" section (or, if you're installing a ROM from your SD card, go to "Install ROM from SD card" and pick your ROM). It will download, if applicable, and then give you this prompt: Always, always, always back up your existing ROM before flashing something new. Then, if something goes wrong, you can always restore to your latest backup, either through ROM Manager (by going to "Manage and Restore backups" on the main menu) or by booting into recovery mode and choosing "nandroid". Generally, you'll want to "Wipe Data and Cache" if you're moving from a ROM based on one Android version to the next (i.e. a 2.1-based ROM to a 2.2-based ROM). You'll also want to check the main download page of the ROM you're installing (which you can find through TheUnlockr) to see if they recommend wiping for that particular version. "Wipe Data and Cache" basically means that all your settings will be returned to stock—If you weren't running a Froyo build beforehand, you'll have to re-download all your apps, as well as rearrange your home screens and reconfigure all your custom settings every time you wipe. In the end, you can always try not wiping and see what happens—if you flash a ROM and have problems, it's pretty easy to restore from your backup and try again.
    2nd Method:
    1. After you download the .zip to your computer, plug in your device via USB cable.
    2. Copy the .zip file to the SD Card (do NOT extract it, just copy the whole zip file).
    3. Unplug your device.
    4. Swich off your phone, now open clockworkmod recovery. search in google and find or comment below, for e.g. ( when the swich is off, press menu button+power button+vol. up+vol.down..(my device is samsung galaxy ace plus))
    5. when the recovery mode is open, use the volume buttons to navigate and power button to select.
    6. If you want to backup your default rom select backup and restore option and click on backup hit yes to confirm (this will save you if something goes wrong), if you want to back install default backup then click on restore option, then select your backup rom .zip file.Then select Backup and hit yes to confirm. Wait for it to finish backing up your current system .
    7. Select Wipe Data / Factory Reset 8. Select Choose zip from sdcard.
    9. Select ROM.zip from sdcard
    10. Find the ROM we copied to the sdcard in ROM.zip format and select it. Then select yes to confirm. Wait for it to finish flashing. 11. Select Reboot System Now. Once it reboots (which will take a while the first time), you’ll be running the new ROM.

    We have recently posted many tips and tricks on Android but Today I come with latest and most useful trick to run "Run Android on your PC" . Yes, it is possible ! you have to just follow the simple steps of this tutorial. By running android on you will able to run android apps on your PC and also accelerated garphics performance and many more things. In this tutorial i am going to install jelly bean 4.3 on my machine.

    Run Android On Your PC [Complete Tutorial]:
    Requirements :

    • 1. Oracle VM VirtualBox Download the latest version of VirtualBox
    • 2. Download  Android x86  Image file.
    • You can also run other android versions like jelly bean, ICS, Honeycomb etc. which can be downloaded from here.

    Steps :
    1. Install VirtualBox on your PC.
    2. Open VirtualBox and select New. In the dialog box enter the name as your wish and select
    i) Type : Linux.
    ii) Version : Other Linux.
    and select Next.

    3. In the next dialog box enter the memory size as your wish. 
    Note : Minimum 1 GB required for JellyBean
    and click on next.
    4. In the next dialog box select create a virtual hard drive now. Then select VDI or VHD and select fixed or dynamically allocated as your wish and create the virtual drive.
     

    Note :
     Mininimum 1 GB required for installation.

    5. 
    Select Virtual device and select settings, a dialog box appears. In the dialog box select.
    i) Storage -> Storage Tree -> Empty.
    ii) In the attributes section select the Android 4.3 iso file you downloaded and check Live Cd/Dvd, then click Ok.

    6. Then start the virtual device. In the screen select Install Android-x86 to hard disk.
    7. In the next screen select Create/Modify Partition.
    8. Then create a new primary bootable partition and select write. After finishing writing select quit.
    9. Then install android in sda1 and select type as ext3 , choose yes for installing.
    10. After installing remove live iso from VirtualBox and reboot. Now you can boot into Android 4.3 .
    You are done.
    SOME SCREENSHOTS:
      

    Hello friends, today in this post i'm introducing a new technique and some tips to increase RAM of your android device. This difference in hardware can greatly affect your phone, you can not use bigger size apps, and can not play heavy games or you can not run multiple application at the same time or the hanging problem and many more. But everyone can not afford the high range phones. And majority of this problem is due to the processor and the ram size. So in this post, i'm talking about how to increase ram of your android phone and you also play heavy games and use multiple applications.

    How to Increase Ram In Android Using Sd Card ?
    Note: Increasing ram does not mean that you are internally adding some hardware to your Android phone. Its not possible for a normal man to alter the hardware of Android device so as to increase its Ram. Its been risky and one need to be professional to change the hardware. And also manufacturer has some guidelines for this.  But don’t worry there is some simple way to increase ram in Android, you just need to follow the instruction. And you can easily increase your ram in maximum 10-15 minutes. Using this method or trick you can increase your ram upto 4 GB.

    Requirements:


    • 1. SD card as you want but class 4 or higher SD Card will give excellent speed to your Phone.
    • 2. Rooted smartphone.
    •     Or Rooted Tablet (If you want to increase RAM and Internal Memory of it.)
    • 3. SD card reader
    • 4. Windows PC
    • 5. An internet connection for downloading a few softwares or you can get it from somewhere else also.
    Partition Your SD Card:
    First step you have to do is to partition your SD Card and for doing this you have to,

    1. Download Mini tool Partition from Here.

    2. Install the application on your PC and connect your SD card to your PC with Card Reader.

    3. Open Mini Tool Partition in your PC and when the wizards open click on your SD Card and select Delete option. (Note: This will format your SD Card completely mean that it will erase your data permanently, so previous to doing this backup your data at any place in PC or other Storage device.)

    4. When the Formatting of your SD Card is completed then, you have whole of space of your SD Card as unallocated then Right click SD Card and select make option.

    5. A popup box will open giving you options for making partition; select the partition as primary and file system as FAT if SD Card is less than 4GB or FAT32 if your SD Card is more than 4GB.

    6. Leave about 512 MB or more space (your choice) for making the next partition.

    7. Then select done and do right click on unallocated space of your SD Card and again click make option. Select Primary partition but change the file system to Ext2, Ext3 or Ext4.

    Note: (Ext2 is not compulsory as most ROMs work fine with it). 

    How To Make Ram Of SD Card Android:

    1. Click Apply Changes and then process goes on for the few minutes and then partition is completed.

    2. Install Link2sd from Google Play or download and install the .apk format file from here to your phone.

    3. On the first launch of the app, it will question for root permissions and then, it will question you the file system of the .ext partition that you had before made, choose the option as you had choose in the partitioning steps.

    4. Sort the apps according to size and start linking them.

    You have done your task Enjoy. Comment below if you facking any problem.
    Rooting an android phone can be a time taking process . Today we are going to show you the simplest way to Root almost any android phone without a pc . Recently, i posted two articles in android category, first is Advantages of Rooting your Smartphone & second is Root Your Android Phone Just In One Minute.

    Framaroot
     is a one click application that roots almost any android phone or device without the need of a Computer . Framaroot was developed by alephzain from The XDA forums . With one click this app can install the Superuser and Su binary on your phone . Framaroot currently supports phones with Android versions from 2.0 to 4.2 . This is one of the easiest and fastest rooting methods.

    How to Root Android Phone Without Pc:
    Step 1: Download the Framaroot app to your Computer or Mobile.
    Step 2: Copy Framaroot from your computer to your phone memory.
    Step 3: Install Framaroot from the apk file.
    Step 4: Choose “install Superuser” option inside Framaraoot.


    Step 5: Select any of the exploits that appears in the app and wait for some time.
    Step 6: If you see a “Success … Superuser and su binary installed. You have to reboot your device” message then you have successfully rooted your phone.

    Step 7: If you see “Failed … Try another exploit if available” message then try selecting another exploit.

    Download Root checker to verify if your phone is rooted or not .Download Root checker to verify if your phone is rooted or not.

    Tweetings for Twitter v2.14.2 Application Software for Android Download


    Click here to download Tweetings for Twitter v2.14.2 Application Software for Android Download
    Download Tweetings for Twitter v2.14.2 Application Software for Android
    Download Tweetings for Twitter v2.14.2 Application Software for Android

    Tweetings is a powerful Twitter Client for Android devices.
    *Large screen support with panes
    *Supports posting to TwitLonger and inline expansion
    *Uploading pic.twitter.com images as well as Img.ly, TwitPic and yFrog
    *Customize, edit, apply filters to photos
    *Can be configured to automatically resend failed tweets
    *TweetMarker & Tweetings Cloud Timeline Sync support
    *Stream Tweets over WiFi... let the tweets flow, no need to refresh your main timelines again
    *Manage multiple accounts
    *Split long tweets into multiple shorter tweets
    *Google Cloud push notifications for mentions, dms, when you get a new follower, when you are retweeted, etc
    *Inline image previews
    *Navigate timeline using volume keys (optional)
    *User photo timelines
    *Schedule tweets: write a tweet, set a time and a date and then just wait. Your device doesn't even need to be turned on!
    *Saved Searches
    *View tweeting user's nearby on a map
    *Local Trends
    *Translate tweets
    Requirements:
    Android 2.3 and up
    This version Includes:
    *Media uploads will now show an upload progress bar
    *Setting to automatically upload images on third party image providers as soon as they are selected, allowing more than one image per tweet

    DOWNLOAD LINKS:
    Size:- (5.6MB)
    Password : koskomputer